Neutron/ML2/LenovoML2Mechanism
联想网络 Openstack Neutron 插件
您将在此处找到有关 Liberty 和 Kilo 版联想厂商代码 Neutron ML2 驱动程序的详细信息。
- 自由软件:Apache 许可
- 文档:https://github.com/lenovo/networking-lenovo
- 源代码:https://github.com/lenovo/networking-lenovo
- Bug 报告:http://bugs.launchpad.net/networking-lenovo
概述
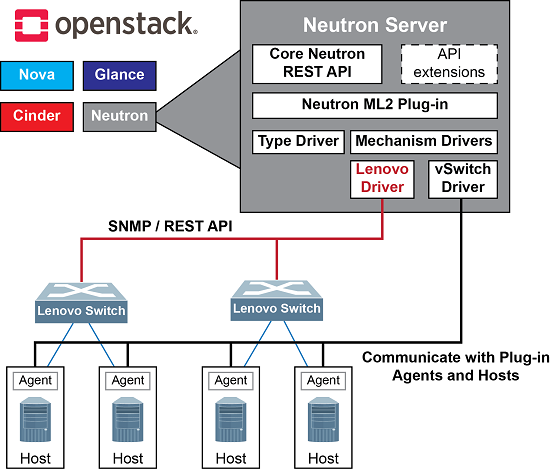
Openstack 是一个开源基础设施倡议,用于在云计算环境中创建和管理大型虚拟专用服务器组。联想的网络 Neutron ML2 驱动程序提供了一种在联想物理交换机上编排 VLAN 的方法。在虚拟机由物理服务器托管的云环境中,虚拟机看到由主机机器提供的新的虚拟访问层。
这个新的访问层通常可以通过许多机制创建,例如 Linux 网桥或虚拟交换机。当设置虚拟访问层(虚拟网络)的策略时,现在必须与硬件交换机中设置的策略协调。联想的 Neutron 插件有助于自动协调此行为,无需管理员干预。下图提供了联想 ML2 插件和交换机如何适应 Openstack 部署的架构概述。
通用要求
以下矩阵列出了支持的组件
| 组件 | Newton/Ocata 要求 | Mitaka 要求 | Liberty 要求 | Kilo 要求 | |
|---|---|---|---|---|---|
| OpenStack 版本 | Queens | Newton/Ocata | Mitaka | Liberty | Kilo |
| 联想交换机 | 运行 CNOS 的交换机 - 联想 ThinkSystem:NE1032、NE1032T、NE1072T、NE10032、G8272、G8296、G8332 运行 ENOS 的交换机 - G7028、G7052、G8052、G8124E、G8264、G8264CS、G8272、G8296、G8332、CN4093、EN4093R、SI4091 和 SI4093(非-SPAR 模式)、NE0152T |
运行 CNOS 的交换机 - 联想 ThinkSystem:NE1032、NE1032T、NE1072T、NE10032、G8272、G8296、G8332 运行 ENOS 的交换机 - G7028、G7052、G8052、G8124E、G8264、G8264CS、G8272、G8296、G8332、CN4093、EN4093R、SI4091 和 SI4093(非-SPAR 模式) |
运行 CNOS 的交换机 - 联想 ThinkSystem:NE1032、NE1032T、NE1072T、NE10032、G8272、G8296、G8332 | 运行 CNOS 的交换机 - G8272 运行 ENOS 的交换机 - G7028、G7052、G8052、G8124E、G8264、G8264CS、G8272、G8296、G8332、CN4093、EN4093R、SI4091 和 SI4093(非-SPAR 模式) |
运行 ENOS 的交换机 - G8332、G8272、G8264、G8052 |
| 网络操作系统版本 | CNOS 10.5.1 或更高版本; ENOS 8.4.6.0 或更高版本 CNOS 10.8.1 或更高版本支持 VXLAN |
CNOS 10.5.1 或更高版本;ENOS 8.4.6.0 或更高版本 | NE* 交换机 – 10.4.x 或更高版本 G8272、G8296 - 10.2.1.0 或更高版本 G8332 – 10.3.1.0 或更高版本 |
7.9.x 或更高版本,8.1.x 或更高版本,10.1 或更高版本 | 7.9.x,8.1.x 或更高版本 |
| Linux 发行版 | Red Hat RHEL 7.5;RHOSP13,Ubuntu 16.04 LTS,Juju 2.3 | Red Hat RHEL 7.5;RHOSP10 Red Hat 认证(Newton);RHOSP11(Ocata) Ubuntu 16.04 LTS,Juju 2.3 |
Red Hat RHEL 7.3,RHOSP9 Red Hat 认证 Ubuntu 14.04 LTS |
Red Hat RHEL 7.2,RHOSP8 Red Hat 认证 Ubuntu 14.04 LTS |
Red Hat RHEL 7.1,RHOSP7 Red Hat 认证 Ubuntu 14.04 LTS,Juju 1.x |
User Guide
提供联想 Networking ML2 用户指南,以协助安装和设置这些驱动程序 - 下载用户指南
下载联想 ML2 驱动程序代码
联想 Networking ML2 驱动程序代码位于 Github 上。
联想网络产品
在 联想网络网站 上了解有关联想数据中心交换机的更多信息
推荐的网络配置
以下是单端口服务器连接的示例,其中不需要冗余
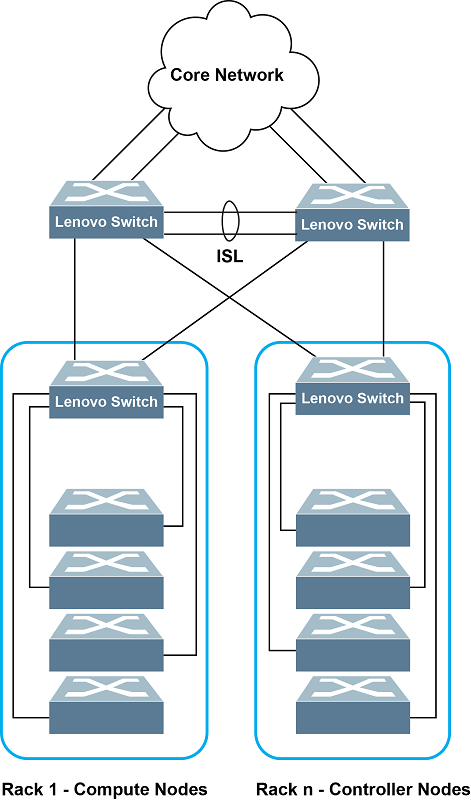
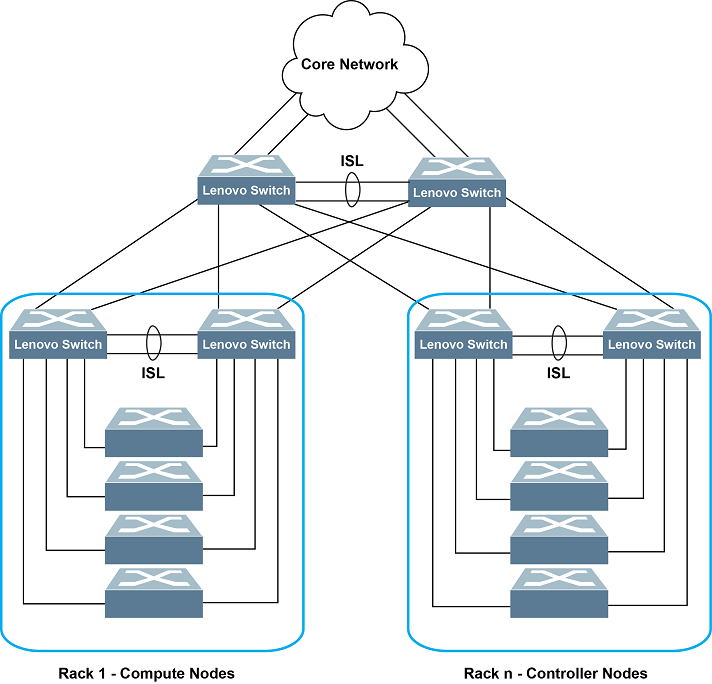
当需要网络冗余时,建议使用联想 VLAG,如下所示
当需要 VXLAN 时,以下网络场景如下所示
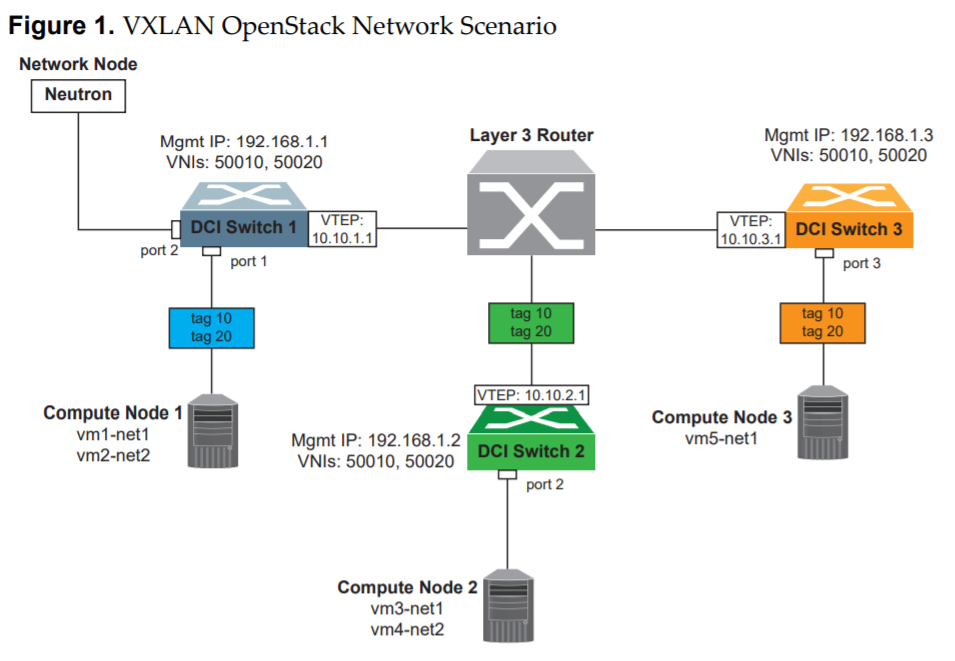
VXLAN 场景说明:考虑上述网络场景,所有 OpenStack Compute 和 Network 节点都连接到数据中心互连 (DCI) 交换机。如果网络节点和控制器节点安装在一起,请也将这些节点连接到交换机。DCI 交换机通过分层 3 路由网络中的 VXLAN 隧道端点 (VTEP) 连接在一起。以下是此场景的配置文件。
使用联想 Openstack ML2 驱动程序
联想插件将在面向服务器的访问层交换机端口上提供动态 VLAN 配置,该配置将 Openstack 网络映射到物理基础设施。
1. 联想插件安装
以下是使用联想 Neutron 插件管理联想交换机设置 Openstack 部署的详细步骤。
1.1 联想插件先决条件
使用插件的先决条件如下
- 安装 python pip 和 git,以便从 Github 下载文件
对于 Red Hat,请使用以下命令
% sudo yum install python-pip git
对于 Ubuntu,请使用以下命令
% sudo apt-get install python-pip git
- 安装 ncclient v0.4.2 Python 库,用于 NETCONF 客户端。有关 ncclient 的更多信息,请参见 http://ncclient.grnet.gr/。
注意:从 Newton 和 Ocata OpenStack 版本开始,不支持基于 NETCONF 的与 ENOS 交换机的通信。请改用 SNMP。
- 使用 pip 包管理器在您的 shell 提示符处安装带有 ncclient 库
% sudo pip install ncclient==0.4.2
- 如果使用 SNMP 配置交换机(仅 Liberty 版本),则还必须安装 pysnmp 包
% sudo pip install pysnmp
- 确定 Openstack 部署的 VLAN 池,例如 1001-2001。这对于配置上行端口和插件是必需的。
- 配置物理网络拓扑;根据需要将分配的 VLAN 池添加到上行端口和汇聚交换机。应根据需要配置其他协议,例如 ACL、交换机访问凭据。
- 必须在所有 Openstack 管理的交换机上启用 SSH。这是 NETCONF 协议所必需的。
- 在 VLAG 模式下,ISL 和 Portchannel/LACP trunk 应该在相关的交换机上创建,因为插件不会配置这些属性。
- 连接到 VLAG 交换机的服务器 NIC 需要配置 NIC 绑定(有关示例,请参见网络拓扑部分)。
- 安装 Openstack 控制器和网络节点。在安装联想 Neutron 驱动程序之前,Openstack 需要正在运行。
1.2 ML2 安装过程
本节将介绍在多节点环境中安装联想 Networking Openstack ML2 驱动程序插件的过程,该环境使用 Redhat Enterprise Linux Openstack 7/8/10、Ubuntu 14.04/16.04 LTS 或 CentOS7.3。
下载联想 ML2 驱动程序
ML2 安装文件可以从联想 Stackforge Github 站点使用“git clone”下载,如下所示
% sudo git clone https://github.com/lenovo/networking-lenovo.git
设置联想 ML2 插件
下一步是安装插件
% cd  networking-lenovo
% sudo python setup.py install
至此,联想 ML2 驱动程序(厂商代码)的安装步骤完成。
1.2.1 Redhat Openstack 设置
以下步骤适用于基于 Kilo 的安装,例如 Redhat Openstack Release 7 环境。
第一步是按照以下方式卸载系统上的当前 neutron
% sudo pip uninstall neutron;
卸载当前 neutron 后,第二步是按照以下方式从 Github 下载联想的 kilo neutron 代码
% sudo git clone https://github.com/lenovo/neutron.git
下载文件后,按照以下方式安装联想 Neutron 驱动程序
% cd neutron
% sudo git checkout staging/kiloplus
% sudo python setup.py install
此时,Kilo 版本的联想 ML2 驱动程序已安装。
对于基于 Liberty 的安装,例如 Redhat Openstack Release 8 环境,或基于 Newton 的安装,例如 Redhat Openstack Release 10 环境,请使用以下步骤。
第一步是按照以下方式从 Github 下载联想的 liberty neutron 代码
For Queens/VXLAN:
% sudo git clone https://github.com/lenovo/networking-lenovo.git -b vxlan
For Newton/Ocata:
% sudo git clone https://github.com/lenovo/networking-lenovo.git -b newton-ocata
For Mitaka and eariler:
% sudo git clone https://github.com/lenovo/networking-lenovo.git
下载文件后,按照以下方式安装联想 Neutron 驱动程序
% cd networking-lenovo
% sudo python setup.py install
此时,Liberty 版本的联想 ML2 驱动程序已安装。
更新 ML2 配置
现在是时候编辑 ml2 配置文件,添加有关使用 VLAN 进行网络的一些基本信息,以及添加本地交换机信息了。
% cd /etc/neutron/plugins/ml2
按照以下方式更改 ml2_conf.ini 文件
% sudo vi ml2_conf.ini,
*      change tenant_network_types = vlan
*      change mechanism_drivers = openvswitch,lenovo
*      configure network_vlan_ranges = xxxx:10:2000
*      copy everything in ml2_conf_lenovo.ini, and concatenate to ml2_conf.ini,
根据网络设置要求更改此部分,添加交换机(s)的 IP 地址、连接详细信息,并更改服务器的主机名
(有关此步骤的更多详细信息,请参见第 2. 插件配置 部分)
Neutron 数据库迁移
% sudo neutron-db-manage --config-file /etc/neutron/neutron.conf --config-file /etc/neutron/plugins/ml2/ml2_conf.ini upgrade head
启动/重新启动 Neutron 服务器 – 此步骤需要退出 mysql
% sudo systemctl start neutron-server.service
如果遇到任何问题,请检查“3. 安装故障排除”部分。
1.2.2 Ubuntu Openstack 设置
以下步骤适用于 Ubuntu 14.x 环境中的基于 Kilo 的安装。第一步是按照以下方式卸载系统上的当前 neutron
% sudo pip uninstall neutron
卸载当前 neutron 后,我们需要按照以下方式从 Github 下载联想的 kilo neutron 代码
% sudo git clone https://github.com/lenovo/neutron.git
下载文件后,按照以下方式安装联想 Neutron 代码
% cd neutron
% git checkout staging/kiloplus
% sudo python setup.py install
此时,联想 ML2 驱动程序已安装,并且 Kilo 的 Neutron 已被替换。
以下步骤适用于 Ubuntu 14.x 环境中的基于 Liberty 的安装,或 Ubuntu 16.04/14.04 环境中的基于 Newton 的安装。
第一步是按照以下方式从 Github 下载联想的 liberty neutron 代码
For Queens/VXLAN:
% sudo git clone https://github.com/lenovo/networking-lenovo.git -b vxlan
For Newton/Ocata:
% sudo git clone https://github.com/lenovo/networking-lenovo.git -b newton-ocata
For Mitaka and eariler:
% sudo git clone https://github.com/lenovo/networking-lenovo.git
下载文件后,按照以下方式安装联想 Neutron 代码
% cd networking-lenovo
% sudo python setup.py install
此时,Liberty 版本的联想 ML2 驱动程序已安装。
更新 ML2 配置
现在是时候编辑 ml2 配置文件,添加有关使用 VLAN 进行网络的一些基本信息,以及添加本地交换机信息了。
% cd /etc/neutron/plugins/ml2
按照以下方式更改 ml2_conf.ini 文件
% sudo vi ml2_conf.ini,
*     change tenant_network_types = vlan
*     change mechanism_drivers = openvswitch,lenovo
*     configure  network_vlan_ranges = xxxx:10:4000
*     copy everything in ml2_conf_lenovo.ini, and concatenate to ml2_conf.ini,
根据网络设置要求更改此部分,添加交换机(s)的 IP 地址、连接详细信息,并更改服务器的主机名
(有关此步骤的更多详细信息,请参见第 2. 插件配置 部分)
Neutron 数据库迁移
% sudo neutron-db-manage --config-file /etc/neutron/neutron.conf --config-file /etc/neutron/plugins/ml2/ml2_conf.ini upgrade head
启动 Neutron 服务器 – 此步骤需要退出 mysql
% sudo service neutron-server restart
如果遇到任何问题,请检查“3. 安装故障排除”部分。
1.2.3 CentOS Openstack 设置
对于基于 Newton 的安装,例如 CentOS Release 7.3 环境,请使用以下步骤。
第一步是按照以下方式从 Github 下载联想的 liberty neutron 代码
% sudo git clone https://github.com/lenovo/networking-lenovo.git -b newton-ocata
% sudo git clone https://github.com/lenovo/networking-lenovo.git -b vxlan
下载文件后,按照以下方式安装联想 Neutron 驱动程序
% cd networking-lenovo
% sudo python setup.py install
此时,Liberty 版本的联想 ML2 驱动程序已安装。
更新 ML2 配置
现在是时候编辑 ml2 配置文件,添加有关使用 VLAN 进行网络的一些基本信息,以及添加本地交换机信息了。
% cd /etc/neutron/plugins/ml2
按照以下方式更改 ml2_conf.ini 文件
% sudo vi ml2_conf.ini,
*      change tenant_network_types = vlan
*      change mechanism_drivers = openvswitch,lenovo
*      configure  network_vlan_ranges = xxxx:10:4000
*      copy everything in ml2_conf_lenovo.ini, and concatenate to ml2_conf.ini,
根据网络设置要求更改此部分,添加交换机(s)的 IP 地址、连接详细信息,并更改服务器的主机名
(有关此步骤的更多详细信息,请参见第 2. 插件配置 部分)
Neutron 数据库迁移
% sudo neutron-db-manage --config-file /etc/neutron/neutron.conf --config-file /etc/neutron/plugins/ml2/ml2_conf.ini upgrade head
重新启动 Neutron 服务器 – 此步骤需要退出 mysql
% sudo systemctl restart neutron-server.service
如果遇到任何问题,请检查“3. 安装故障排除”部分。
2. 联想插件配置
需要修改 /etc/neutron/plugins/ml2/ml2_conf.ini 配置文件中的两个部分。
提供了一个脚本工具,用于自动生成联想插件的配置。Readme 中包含有关使用此工具的说明,请参见此处 - 配置脚本。
手动修改配置文件的步骤如下
第一个部分是在 [ml2[ 中将 Lenovo 包含在 mechanism_drivers 中,并且需要在 ml2_type_vlan 部分定义 network_vlan_ranges。
[ml2]
tenant_network_types = vlan
type_drivers = local,flat,vlan,gre,vxlan
mechanism_drivers = openvswitch,lenovo
# (ListOpt) List of network type driver entrypoints to be loaded from
# the neutron.ml2.type_drivers namespace.
#
# type_drivers = local,flat,vlan,gre,vxlan
# Example: type_drivers = flat,vlan,gre,vxlan

# (ListOpt) Ordered list of network_types to allocate as tenant
# networks. The default value 'local' is useful for single-box testing
# But provides no connectivity between hosts.
#
# tenant_network_types = local
# Example: tenant_network_types = vlan,gre,vxlan

# (ListOpt) Ordered list of networking mechanism driver entrypoints
# to be loaded from the neutron.ml2.mechanism_drivers namespace.
# mechanism_drivers =
# Example: mechanism_drivers = openvswitch,mlnx
# Example: mechanism_drivers = arista
# Example: mechanism_drivers = cisco,logger
# Example: mechanism_drivers = openvswitch,brocade
# Example: mechanism_drivers = linuxbridge,brocade

# (ListOpt) Ordered list of extension driver entrypoints
# to be loaded from the neutron.ml2.extension_drivers namespace.
# extension_drivers =
# Example: extension_drivers = anewextensiondriver

[ml2_type_vlan]
# (ListOpt) List of <physical_network>[:<vlan_min>:<vlan_max>] tuples
# specifying physical_network names usable for VLAN provider and
# tenant networks, as well as ranges of VLAN tags on each
# physical_network available for allocation as tenant networks.
#
# network_vlan_ranges =
# Example: network_vlan_ranges = physnet1:1000:2999,physnet2
network_vlan_ranges = default:1000:1999
第二个部分是将联想交换机信息添加到此配置文件的 [ml2_mech_lenovo] 部分。
包括以下信息(参见下文示例)
- 交换机的主机名/IP 地址
- 连接到交换机的服务器的主机名和端口
- 联想交换机凭据用户名和密码
- 连接到 VLAG 交换机的服务器的 Portchannel 或 LACP 号码
- Netconf 的 SSH 端口号(通常为 830)
如果使用 SNMP 配置交换机(仅 Liberty),则还需要以下 SNMP 信息
注意:为了确保最大安全性,仅支持 SNMP 版本 3。此外,唯一的可用 SNMPv3 身份验证选项是 SHA-96,唯一的可用 SNMPv3 隐私选项是 AES-128。
- SNMP 端口号
- SNMP 版本号(3)
- SNMP 用户名
- SNMP 身份验证和隐私密钥
- SNMPv3 身份验证方法(SHA)
- SNMPv2 隐私方法(AES-128)
可以为每个交换机配置多个服务器到交换机端口映射。配置仅受可用端口数量的限制。
For Kilo configuration
[ml2 mech Lenovo:10.240.179.65]
# Hostname and port used on the switch for this compute host.
nova-node-1 = portchannel:64

# Port number where the SSH will be running on the Lenovo switch.  Default is 22 so this variable only needs to be configured if different.
ssh port = 830

# Provide the switch login information
username = admin
password = admin

[ml2 mech Lenovo:10.240.179.64]
# Configuration second switch
nova-node-1 = portchannel:64
ssh port = 830
username = admin
password = admin

[ml2 mech Lenovo:10.240.179.64]
# Configuration second server on second switch
nova-node-2 = 17
ssh port = 830
username = admin
password = admin
For Liberty configuration using SNMP
[ml2_mech_Lenovo:1.1.1.1]
# Hostname and port used on the switch for this compute host.
compute01 = portchannel:64
compute02 = 17

# Port number where the SSH will be running on the Lenovo switch.  Default is 22 so this variable only needs to be configured if different.
ssh_port = 830

# Provide the switch login information
username = user1
password = passw0rd

# This is to let the driver know SNMP protocol will be used to communicate with this switch.  If not defined then assume Netconf is used.
protocol = SNMP

# Port number for SNMP
snmp_port=161

# SNMP version number
snmp_version=3

# SNMP username
snmp_user=adminshaaes

# SNMP Auth key and Priv key.
snmp_authkey=key1
snmp_privkey=key2

#  SNMPv3 auth option.
snmp_auth=SHA

# SNMPv2 priv options.
snmp_priv=AES-128
Newton/Ocata 版本有一个新的配置项:plugin_mode=compatible
如果交换机是 CNOS 发布版本 10.6.0.20 或更高版本(版本 10.6.1),
或者交换机是 ENOS 发布版本 8.4.6.4 或更高版本,则需要打开此配置项。否则,请注释掉此项。使用 REST API 作为 CNOS 交换机 10.6.0.20 版本的驱动程序的示例配置。
For Newton configuration using REST API
[ml2_mech_Lenovo:1.1.1.1]
os = cnos
protocol = rest
# Port number for RestApi.
rest_tcp_port = 443
# Hostname and port used on the switch for this compute host.
compute01 = portchannel:64
compute02 = port:1/17

# Provide the switch login information
username = user1
password = passw0rd

#comment below item since the switch version is 10.6.0.20
#plugin_mode = compatible
随着更多交换机和服务器添加到网络中,配置文件需要使用这些详细信息进行更新。完成此配置后,现在可以从 Horizon 仪表板或 Openstack 命令行创建网络。
VXLAN 配置:如果需要 VXLAN,则显示了其他配置选项,如下所示
[ml2_type_lenovo_vxlan]
vxlan_range_base = xxx
"vxlan_range_base" is the start vni that going to be used for ML2 plugin, the end vni depends on the number of vlan id in your Openstack.

network_mode = vxlan
When "network_mode" is set to vxlan, ML2 will configure vxlan mapping on switches. The default value is vlan.

virtuel_interface_ip = 10.10.1.1
"virtuel_interface_ip" is the VETP address of a switch.
以下是上述图片(图 1)中显示的 vxlan 场景的示例配置
[ml2_type_lenovo_vxlan]
vxlan_range_base = 50000
[ml2_mech_lenovo:192.168.1.1]
os = cnos
protocol = rest
rest_tcp_port = 443
username = admin
password = admin
# plugin_mode = compatible
# compute_node_1 is the hostname of compute node 1 in above scenario
compute_node_1 = port:1/1,port:1/2
compute_node_2 = port:1/2
compute_node_3 = port:1/2
network_mode = vxlan
virtual_interface_ip = 10.10.1.1
[ml2_mech_lenovo:192.168.1.2]
os = cnos
protocol = rest
rest_tcp_port = 443
username = admin
password = admin
# plugin_mode = compatible
compute_node_2 = port:1/2
network_mode = vxlan
virtual_interface_ip = 10.10.2.1
[ml2_mech_lenovo:192.168.1.3]
os = cnos
protocol = rest
rest_tcp_port = 443
username = admin
password = admin
# plugin_mode = compatible
compute_node_3 = port:1/3
network_mode = vxlan
virtual_interface_ip = 10.10.3.1
3. 安装故障排除
如果 Neutron 服务未启动
1. 检查位于 /var/log/neutron/server.log 的 Neutron 日志文件。
2. 验证 Lenovo 插件详细信息是否在 mysql 数据库中
% sudo mysql –u root –p –h [your IP]

mysql> use neutron;

mysql>  show tables;
(验证以下表是否存在 lenovo_ml2_nosport_bindings)
4. 支持策略
此软件作为开源代码提供,因此,联想不为此产品提供任何支持权利。如果在使用此驱动程序与联想交换机时遇到任何问题,Openstack launchpad 应用程序是对此提出 bug 的一个好工具,联想可能会尽最大努力解决此问题。