Cisco-neutron
目录
适用于跨多个物理交换机的 Neutron L2 网络叠加层的 Cisco 插件 (Havana 版本)
简介
此插件实现提供以下功能
- Neutron 插件框架的参考实现 (有关详细信息,请参阅:https://wiki.openstack.org/quantum-multi-switch-plugin)
- 支持网络中的多个交换机
- 支持同时使用多种交换机型号
- 支持使用多种 L2 技术
- 支持 Cisco Nexus 系列交换机 (已验证与 Nexus 3000、5000、7000 和 9000 系列)
叠加架构
Cisco 插件叠加架构使用模型层将 Nexus 插件叠加在 Openvswitch 插件之上。它支持 Openvswitch 插件的两种分段方法:VLAN 和 GRE 隧道。
先决条件
(以下内容仅在使用系统中 Nexus 设备时才需要。如果您计划仅利用插件框架,则不需要这些。)
如果您的拓扑中使用 Nexus 交换机,您需要以下 NX-OS 版本和软件包才能启用 Nexus 支持
- NX-OS 5.2.1 (Delhi) Build 69 或更高版本。
- paramiko 库 - Python 的 SSHv2 协议库
- ncclient v0.3.1 - Python NETCONF 客户端库
- 您需要由 Cisco Systems 修改的 ncclient 版本。要获取它,请从您的 shell 提示符执行
git clone git@github.com:CiscoSystems/ncclient.git
sudo python ./setup.py install
- 有关 ncclient 的更多信息,请参阅:http://schmizz.net/ncclient/
- 支持的操作系统
- RHEL 6.1 或更高版本
- Ubuntu 11.10 或更高版本
- 软件包:python-configobj-4.6.0-3.el6.noarch (或更新版本)
- 软件包:python-routes-1.12.3-2.el6.noarch (或更新版本)
- 软件包:pip install mysql-python
模块结构
- neutron/plugins/cisco/ - 包含网络插件框架
- /client - 核心和扩展 API 的 CLI 模块
- /common - 整个插件通用的模块
- /conf - 所有配置文件
- /db - 持久化框架
- /models - 将逻辑抽象与物理拓扑联系起来的类
- /nexus - Nexus 特定模块
- /test/nexus - 用于测试插件的假 Nexus 驱动程序
基本插件配置
1. 备份 /etc/neutron/neutron.conf
2. 编辑 /etc/neutron.conf 并编辑 v2 API 的 "core_plugin"。同时验证/添加 keystone 信息。
core_plugin = neutron.plugins.cisco.network_plugin.PluginV2

[keystone_authtoken]
auth_host = <authorization host's IP address>
auth_port = 35357
auth_protocol = http
admin_tenant_name = service
admin_user = <keystone admin name>
admin_password = <keystone admin password>
3. MySQL 数据库设置
- 3a. 使用以下命令在 mysql 中创建 neutron_l2network 数据库 -
mysql -u<mysqlusername> -p<mysqlpassword> -e "create database neutron_l2network"
- 3b. 在 /etc/neutron/plugins/cisco/cisco_plugins.ini 文件的 [DATABASE] 部分中输入 neutron_l2network 数据库配置信息。
4. 配置模型层以使用 Openvswitch 作为 vswitch 插件
- 更新 /etc/neutron/plugins/cisco/cisco_plugins.ini 文件的 [cisco_plugins] 部分的 "vswitch_plugin" 值
vswitch_plugin=neutron.plugins.openvswitch.ovs_neutron_plugin.OVSNeutronPluginV2
Cisco 插件在 Openvswitch GRE 隧道模式下的叠加
在这种模式下,Nexus 交换机不配置任何内容,充当简单的直通。
- 使用以下设置在 /etc/neutron/plugins/openvswitch/ovs_neutron_plugin.ini 中配置 OVS 插件
[ovs]
tenant_network_type = gre
enable_tunneling = True
tunnel_id_ranges = 1:1000
local_ip = 172.29.74.73
- 修改 /etc/neutron/plugins/cisco/cisco_plugins.ini 的 [cisco] 部分以添加模型类和假 Nexus 驱动程序
[cisco]
model_class=neutron.plugins.cisco.models.virt_phy_sw_v2.VirtualPhysicalSwitchModelV2
nexus_driver=neutron.plugins.cisco.test.nexus.fake_nexus_driver.CiscoNEXUSFakeDriver
启动 neutron-server 时,请确保包含两个文件的 --config-file 参数
/usr/bin/python /usr/bin/neutron-server --config-file /etc/neutron/neutron.conf --log-file /var/log/neutron/server.log --config-file /etc/neutron/plugins/cisco/cisco_plugins.ini --config-file/etc/neutron/plugins/openvswitch/ovs_neutron_plugin.ini
或者,您可以将 [ovs] 部分直接包含在 /etc/neutron/plugins/cisco/cisco_plugins.ini 中
[cisco]
model_class=neutron.plugins.cisco.models.virt_phy_sw_v2.VirtualPhysicalSwitchModelV2
nexus_driver=neutron.plugins.cisco.test.nexus.fake_nexus_driver.CiscoNEXUSFakeDriver

[ovs]
tenant_network_type = gre
enable_tunneling = True
tunnel_id_ranges = 1:1000
local_ip = 172.29.74.73
然后使用一个较少的 --config-file 参数启动 neutron-server
/usr/bin/python /usr/bin/neutron-server --config-file /etc/neutron/neutron.conf --log-file /var/log/neutron/server.log --config-file /etc/neutron/plugins/cisco/cisco_plugins.ini
Cisco 插件在 Openvswitch VLAN 模式下的叠加
- 使用以下设置在 /etc/neutron/plugins/openvswitch/ovs_neutron_plugin.ini 中配置 OVS 插件
[ovs]
bridge_mappings = physnet1:br-eth1
network_vlan_ranges = physnet1:1000:1100
tenant_network_type = vlan
- 配置 /etc/neutron/plugins/cisco/cisco_plugins.ini: 的 [cisco_plugins]
[cisco_plugins]
#nexus_plugin=neutron.plugins.cisco.nexus.cisco_nexus_plugin_v2.NexusPlugin
vswitch_plugin=neutron.plugins.openvswitch.ovs_neutron_plugin.OVSNeutronPluginV2
- 在 /etc/neutron/plugins/cisco/cisco_plugins.ini 中配置 Nexus 交换机信息。格式应包括交换机的 IP 地址、连接到交换机的主机以及主机连接到交换机的端口。此外,添加 Nexus 交换机凭据用户名和密码。您可以配置多个交换机以及每个交换机上的多个主机,如下例所示
[NEXUS_SWITCH:1.1.1.1]
# Hostname and port used of the node
compute-1=1/1
# Hostname and port used of the node
compute-2=1/2
# Port number where the SSH will be running at the Nexus Switch, e.g.: 22 (Default)
ssh_port=22
# Provide the Nexus credentials, if you are using Nexus switches. If not this will be ignored.
username=admin
password=mySecretPasswordForNexus

[NEXUS_SWITCH:2.2.2.2]
# Hostname and port used of the node
compute-3=1/15
# Hostname and port used of the node
compute-4=1/16
# Port number where the SSH will be running at the Nexus Switch, e.g.: 22 (Default)
ssh_port=22
# Provide the Nexus credentials, if you are using Nexus switches. If not this will be ignored.
username=admin
password=mySecretPasswordForNexus
- 确保运行 Neutron 服务的宿主机的 SSH 主机密钥被所有 Nexus 交换机所知。您只需将您的 Neutron 宿主机作为运行 Neutron 的用户登录,并至少 SSH 到交换机一次即可做到这一点。如果主机密钥发生更改(例如,由于交换机的更换或交换机上 SSH 配置的清除),您可能需要重复此步骤并从 ~/.ssh/known_hosts 中删除旧的主机密钥。
- 通常,请确保您系统中使用的每个 Nexus 交换机在上述文件中都有凭据条目。这对于系统能够与这些交换机通信是必需的。
- 启动 Neutron 服务。如果出现问题,请验证上述每个文件的配置。启动 neutron-server 时,请确保包含两个文件的 --config-file 参数
/usr/bin/python /usr/bin/neutron-server --config-file /etc/neutron/neutron.conf --log-file /var/log/neutron/server.log --config-file /etc/neutron/plugins/cisco/cisco_plugins.ini --config-file/etc/neutron/plugins/openvswitch/ovs_neutron_plugin.ini
或者,您可以将 [ovs] 部分直接包含在 /etc/neutron/plugins/cisco/cisco_plugins.ini 中
[ovs]
bridge_mappings = physnet1:br-eth1
network_vlan_ranges = physnet1:1000:1100
tenant_network_type = vlan

[cisco_plugins]
#nexus_plugin=neutron.plugins.cisco.nexus.cisco_nexus_plugin_v2.NexusPlugin
vswitch_plugin=neutron.plugins.openvswitch.ovs_neutron_plugin.OVSNeutronPluginV2

[NEXUS_SWITCH:1.1.1.1]
# Hostname and port used of the node
compute-1=1/1
# Hostname and port used of the node
compute-2=1/2
# Port number where the SSH will be running at the Nexus Switch, e.g.: 22 (Default)
ssh_port=22
# Provide the Nexus credentials, if you are using Nexus switches. If not this will be ignored.
username=admin
password=mySecretPasswordForNexus

[NEXUS_SWITCH:2.2.2.2]
# Hostname and port used of the node
compute-3=1/15
# Hostname and port used of the node
compute-4=1/16
# Port number where the SSH will be running at the Nexus Switch, e.g.: 22 (Default)
ssh_port=22
# Provide the Nexus credentials, if you are using Nexus switches. If not this will be ignored.
username=admin
password=mySecretPasswordForNexus
然后使用一个较少的 --config-file 参数启动 neutron-server
/usr/bin/python /usr/bin/neutron-server --config-file /etc/neutron/neutron.conf --log-file /var/log/neutron/server.log --config-file /etc/neutron/plugins/cisco/cisco_plugins.ini
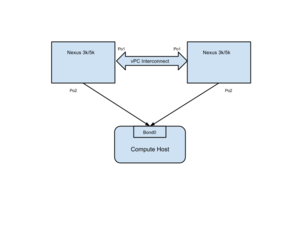
Cisco 插件 vPC (虚拟端口通道) 模式
Cisco 插件支持 vPC 设置中的多宿主机。典型的 vPC 设置如图所示
先决条件
- Cisco 插件不会设置交换机之间的 vPC 互连通道。这需要根据此文档手动执行:NXOS vPC 配置
- 主机上的数据接口必须绑定,并且此绑定接口应连接到外部网桥。
插件配置
- 要在插件中配置 vPC,您需要告知插件每个主机有多个连接。例如,如果主机 1 通过端口通道 2 连接到两个 nexus 交换机 1.1.1.1 和 2.2.2.2;您的配置将是
[NEXUS_SWITCH:1.1.1.1]
# Hostname and port used of the node
host1=portchannel:2
# Port number where the SSH will be running at the Nexus Switch, e.g.: 22 (Default)
ssh_port=22
# Provide the Nexus credentials, if you are using Nexus switches. If not this will be ignored.
username=admin
password=mySecretPasswordForNexus

[NEXUS_SWITCH:2.2.2.2]
# Hostname and port used of the node
host1=portchannel:2
# Port number where the SSH will be running at the Nexus Switch, e.g.: 22 (Default)
ssh_port=22
# Provide the Nexus credentials, if you are using Nexus switches. If not this will be ignored.
username=admin
password=mySecretPasswordForNexus
- 需要为 vPC 设置指定 etherytype(端口通道、etherchannel 等),否则插件将假定 etherytype 为以太网。
- 非 vpc 设置不受此功能影响,无需进行任何配置更改。
如何测试安装
单元测试位于 neutron/tests/unit/cisco/。它们可以从 Neutron 顶层目录使用 tox 执行([sudo] pip install pip testrepository)
1. 测试核心 API(未配置 UCS/Nexus/RHEL 设备子插件)
- 默认情况下,etc/neutron/plugins/cisco/cisco_plugins.ini 中所有设备子插件均已禁用(已注释)。
   tox -e py27 -- neutron.tests.unit.cisco.test_network_plugin
   tox -e py27 -- neutron.tests.unit.cisco.test_nexus_plugin
2. 要测试 Nexus 设备子插件,请执行以下配置
- 编辑 etc/neutron/plugins/cisco/cisco_plugins.ini 以添加:在 [CISCO_PLUGINS] 部分添加
nexus_plugin=neutron.plugins.cisco.nexus.cisco_nexus_plugin_v2.NexusPlugin
- 编辑 etc/neutron/plugins/cisco/cisco_plugins.ini 文件。如果不使用 Nexus 硬件,请逐字使用以下虚拟配置
[NEXUS_SWITCH:1.1.1.1]
# Hostname and port used of the node
compute-1=1/1
# Port number where the SSH will be running at the Nexus Switch, e.g.: 22 (Default)
ssh_port=22

[cisco]
nexus_driver=neutron.plugins.cisco.test.nexus.fake_nexus_driver.CiscoNEXUSFakeDriver
旧版本
有关 Grizzly 和旧版本的的信息,请参见此处