Zaqar/发布指南
客户端发布
发布客户端库的流程类似于 服务器端发布所遵循的流程。但是,在这种情况下,PTL 充当“发布经理”。请注意,您必须在 #openstack-infra 中请求将您添加到 Gerrit 中的“marconi-ptl”组,否则 git 会抱怨您没有权限推送到 gerrit 仓库。
版本控制
为了遵循 PEP440,我们需要将 OpenStack 里程碑映射到版本号。 建议采用以下映射。 请注意,中间里程碑版本仅针对 2014.1 所示,但可以想象它们在后续开发周期中遵循类似的模式。 同样,仅针对单个版本给出仅递增 PATCH 版本的 bugfix 版本的示例。
| OpenStack | PEP440 |
|---|---|
| 2014.1 | 0.0.1 |
| 2014.2.b1 | 1.0.0b1 |
| 2014.2.b2 | 1.0.0b2 |
| 2014.2.b3 | 1.0.0b3 |
| 2014.2.rc1 | 1.0.0rc1 |
| 2014.2 | 1.0.0 |
| 2014.2 - Bugfix #1 | 1.0.1 |
| 2014.2 - Bugfix #2 | 1.0.2 |
| 2015.1 | 1.1.0 |
| 2015.2 | 1.2.0 |
| 2016.1 | 2.1.0 |
| 2016.2 | 2.2.0 |
| 2017.1 | 3.1.0 |
| 2017.2 | 3.2.0 |
流程
1. 提交并合并一个补丁来更新库的版本。 此外,在 setup.cfg 中设置适当的分类器(例如,“Development Status :: 4 - Beta”或“Development Status :: 5 - Production/Stable”)。
2. 确保您要标记的本地提交确实存在于已发布的仓库中,并且具有相同的 SHA。
3. 添加发布标签,例如“0.0.1”,并附带以下描述:“Marconi 客户端版本 0.0.1”;它应该由您的个人 gpg 密钥签名
git tag -s 0.0.1
4. 检查标签的正确性。 您希望确保 SHA 与上游仓库中的提交匹配:“git tag -v 0.0.1”。 您应该看到类似的内容
object 9e5323500646c98db712a1c322dd4342cd1d708a
type commit
tag 0.0.1
tagger kgriffs <kurt.griffiths@rackspace.com> 1399313788 -0500

Marconi client version 0.0.1

This is our first beta release supporting the entire v1.0 API. CLI
usage is still a work in progress, but applications can now code
against the entire v1.0 API by importing the marconiclient package.
gpg: Signature made Mon May  5 13:16:54 2014 CDT using RSA key ID AD4A3478
gpg: Good signature from "Kurt E. Griffiths (@ work) <kurt.griffiths@rackspace.com>"
gpg:                 aka "Kurt E. Griffiths <mail@kgriffs.com>"
gpg:                 aka "[jpeg image of size 25764]"
4. 将新标签推送到 gerrit 仓库。 确保 只推送一个标签。
git push gerrit 0.0.1
5. 现在转到 http://status.openstack.org/zuul/,您应该会看到类似的内容
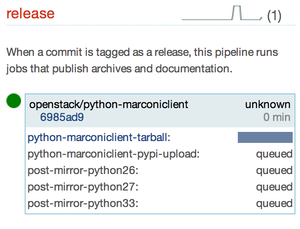
6. 当 openstack/python-marconiclient 消失时,该版本现在可用。 检查以下链接的正确版本
- https://pypi.python.org/pypi/python-marconiclient/
- http://tarballs.openstack.org/python-marconiclient/
7. 转到 launchpad 中相应的 系列(例如,https://launchpad.net/python-marconiclient/juno),并使用表格中的“立即发布”链接发布版本;以 yyyy-mm-dd 格式指定发布日期,并包含一些说明,例如
This package is available in pypi, just execute pip install marconi to install.
Tarball: http://tarballs.openstack.org/python-marconiclient/python-marconiclient-0.0.1.tar.gz

This is our first beta release supporting the entire v1.0 API. CLI
usage is still a work in progress, but applications can now code
against the entire v1.0 API by importing the marconiclient package.
8. 现在您应该将此版本的“Fix Commited”状态的所有 bug 更改为“Fix Released”
9. 使用“添加下载文件”链接将 tarball 上传到已发布的 launchpad 里程碑(https://launchpad.net/marconi/+milestone/juno-1)。 请注意,此链接仅在里程碑“发布”后才会出现。
10. 检查 PyPI 发布
$ pip install python-marconiclient
11. 将下一个里程碑添加到系列中,或者如果处于周期结束,则启动一个新系列并添加第一个里程碑。 在添加新系列时,请务必将发布经理更改为“marconi-drivers”。
12. 向社区发送电子邮件!
服务器端发布
我们遵循标准流程:https://wiki.openstack.org/wiki/ReleaseTeam/How_To_Release